Tuesday

Animal Cookies


A couple of posts ago I mentioned that I actually enjoy making the 15 hour, $400 card; however, when time and money are limited resources, my trick for getting a lot with a little is to limit myself to a single paper pack and a single stamp set.

The gaps in my card stash include little kid birthday cards, thank you, and new baby. Using one paper pack - Animal Crackers (comes with 16 sheets of paper, 8 each of 2 patterns, and wide, white ribbon) and one stamp set - Nursery Bash, (and a stamp from the Thank You set- I know that makes it two stamp sets, but oh well) I made several cards to fill stash gaps.


Happy Crafting!

Wednesday

Ten Minute Card


When I first purposed to make all my own greeting cards, I had a few goals in mind. First, I would challenge myself to greater levels of creativity, I would save myself shopping time and money, and I would always have a card readily available for any occasion. The first step was to spend about 8 - 9 hours online finding a great card to copy, then I purchased a couple thousand dollars worth of supplies and tools to make the card, then I spent another week in my studio crafting the final creation. I repeat these steps for every new card-making event.

This system still works well for me most of the time; however, if I need to produce something quickly it's fun to see what I can do in just ten minutes.

The trick to a 10-minute card is to keep materials to a minimum. I've used baby pink, black, and white cardstock, two stamp sets that I had out anyway, a piece of ribbon, and the first black embellishments I came to when I started rummaging.

Happy Crafting!

Barbeque Apron Invitations


That's right: bbq apron invitations - does it get any better than this? Aren't these just off the "Stinkin' Cute" chart?

They truly are easy. I just made a regular A2 card (4.25 x 5.5 inches) with the fold on top, and I used the oval coluzzle to make the arm holes. The stamp set was CTMH Grill It Up (retired) The little utensils are part of the stamp set - I heat embossed them with copper EP, and cut them out. There were many invitations to do, and I quickly bored with cutting out little utensils, which is why some aprons have them and others don't.

Happy Crafting!

Faux Denim Technique

The faux denim technique is both easy and messy (a sure recipe for fun.) Exactly what I will do with a card proclaiming that "There is a little cowboy in all of us" is still unclear to me, but I just know the perfect occasion will present itself soon.

Materials: All CTMH
Paper: Sarsaparilla
Stamps: Yeehaw

Monday

The Joy of Bows: a Tutorial

This bow-tying tutorial was supposed to go with the Glass Block tutorial here: http://paperescape.blogspot.com/2009/06/glass-block-tutorial.html However, I procrastinated by a few weeks. Better late than never:


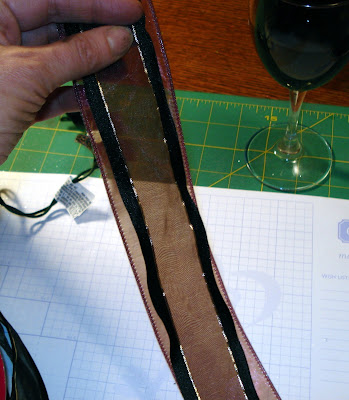
I like a nice wide ribbon with wire edges for the glass blocks; however, any size will work. For this ribbon I used two colors together - black and maroon. The two will make for a nice full bow. You will also need some wire to wrap around the bow and wire cutters to snip the wire. Sometimes I encounter frustrations when bow-tying, so I always keep a glass of wine available. The hand model that I hired called in sick, so I had to use my own hands which were ink stained.


Start by pulling lots of ribbon off the spool, I'm not sure how to quantify "lots", but it's more than a little. I will try to be more specific as we go on.


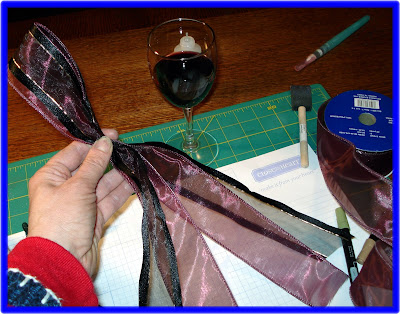
Leaving about a 6 - 8 inch tail, I make a loop that is about 5 - 6 inches long. How long you make it depends on how big you want your final product to be. I make my first 4 loops a little longer than the final loops. Anyway, after I make the loop I twist it a full 360 degrees.


Then I make another loop and I twist the ribbon again. The twisting makes the ribbon hold together better - much easier than trying to manage loose ribbon that is bunching between my finger and thumb. Twisting the ribbon also keeps it turned in the right direction.


Continue with the loop-twist-looping until you have a nice handful of loops. I always do an odd number - usually 7 or 9. This is because my highschool art teacher always stressed the importance of odd numbers. Someday I'll do an even number of loops and see if it produces an unsightly bow.


When I my bow is adequately looped, I wrap wire around it -really tightly- about four or five times. I add a tiny loop to cover the wire wrap, and then I wrap my little loop. This becomes the center of the bow.

Once I have the bow tightly wrapped, I clip the wire and I "fluff it up" twisting the ribbon, opening up the loops so the aren't squished together and I form it into a pleasing shape. See the small loop in the center? That's the final loop that I made while I was wrapping the wire.

The final step is to wrap ribbon around the block and tie it off at the top leaving tails. Use some wire to tie the bow to the top of the ribbon. I also use a little Liquid Glass to hold the bow a bit more securely. Trim the edges of the ribbon and enjoy!

Happy Crafting!

Wednesday

Farm Life Layout


Was there ever a mother who didn't look back and wonder what happened to the days she thought would last forever? I recently completed this layout of pictures taken more than twenty years ago when we were young, energetic, and believed happiness was a goal to reach rather than a way to live.


There aren't many things I would change about those days, but I do wish I'd spent less time trying to "create" a set of circumstances that would spell out happiness, and more time soaking up the beautiful essence of those precious little people who would grow up way, way too fast. I didn't understand that they came to me as complete packages - the seeds of who they would become already planted. I only had to nurture, love, and support. I'm sure I did all those things; but I added an additional dose of worry, stress, and a fear that who we were and what we had to offer wouldn't be enough.


I would like very much to relive the sweetness of their babyhood, the curiosity as they explored the world, and rekindle the magical feeling of being very, very special to a child. But, my lesson is that happiness isn't a goal, but a way of living in the moment. The challenge is to nurture the present while sometimes missing the past.
Details:
All Materials are Close To My Heart, unless otherwise stated:
Sarsasparilla paper pack
Sarsasparilla Stickease
Stamp: Western Flourishes
Dimensional Elements
To purchase any of these supplies, visit my CTMH Website: http://paperescape.myctmh.com
Until next time,
Happy Crafting!

Baby Shower Circle Album


I like to use these circle albums as keepsake gifts for birthdays, anniversaries, or in this case showers. They are small enough to be quick and inexpensive, yet always appreciated momentos of a special event.


Here's an inside shot.


All materials are CTMH unless otherwise noted:
  • Circle Album
  • Paper Garden paper pack

  • Paper Garden Stickease

  • Colonial White ribbon collection

  • assorted buttons

  • Frame of Mind stamp set
  • Cricut cutouts
To purchase supplies go here: http://paperescape.myctmh.com/


Tuesday

Flower Shop and a Brief Word on Focus

It's true. I can't get enough of these adorable cards in a box. They remind me of window shopping. Again, thank you Mothermark for the inspiration. This one is aptly named "Flower Shop."


The sign on the flower shop reads "Happy Birthday;" however, there is virtually no chance this creation will ever leave my studio to become someone else's birthday card. I've simply bonded with it and I can never let it go.

Three tiny flower pots sit in the window - each embossed, edged with scalloped scissors, and tied with pink polka-dot ribbon. The nine flowers, stamped and and lovingly trimmed to release them from the cardstock, are surrounded by tiny green leaves - also stamped and trimmed. The inside is equally adorable with a border of leaves trailing from a bouquet of flowers in the corner. Please pardon my modesty - the card is nothing short of a masterpiece.


Now, for a brief word on focus: Surely we've all been admonished to "keep your eye on the prize," to "visualize the final outcome" to "ask and ye shall receive." So, here's my little story:

I wanted to make limoncello, however the recipe requires 24 large, perfect lemons. I

couldn't even find one decent lemon - even Costco was out. Life had given me Everclear, the other key ingredient to limoncello, but no lemons. Saturday afternoon I was lounging in the sun, wishing I had a batch of limoncello brewing - and guess who came to my door? A LEMON SALESMAN!! That's right. A door-to-door lemon salesman! Who knew that profession even existed?

I sense there is a moral to this story and when I figure out what it is, I'll get back to you.

Until then,


Happy Crafting!

Wednesday

Glass Block Tutorial


These blocks are perfect as nightlights in the kitchen, baby room, or the wine cellar to light up that private midnight wine-tasting soiree (I'm not the only one who does that, am I?)

The first step is to drill a hole in the glass block. I can best describe this as a magical process about which I know nothing.

I bring home a box of blocks from Lowe's; my husband takes them out to his shop, works his magic and delivers them to my studio with holes drilled into the bottom of each of them. I think diamond drill bits are part of the process, but that's just a guess.

Were I ever to ever learn how to drill holes, I'd probably be expected to do it myself. Better that I save my energy for the vastly more important work of stamping.

Here are the rest of the materials:
Christmas lights - small strand that you can stuff into the block
Mulberry paper
Stazon black ink pad
Other ink pads
Stamp of choice - I used a grape set from CTMH
Liquid Glass (CTMH)
Water brush
Glass of wine


I cut out two pieces of mulberry paper slightly larger than the block.

I use the water brush to paint a water line just inside the ridge of the block. Then, I tear the paper along the water line. This makes a nice feathery edge


Next, use a water resistant ink - like Stazon to stamp the image on both pieces of mulberry paper.


Stamp with wild abandon, randomly scattering the image across the surface. If you're worried about mistakes and fear of imperfection causes you to hesitate, refill your wine glass and try again. Mulberry paper is cheap. Now is the time to claim artistic courage.


Now for the fun part - coloring. I do this in different ways. This stamp set is two-part; so there are outline stamps and inside stamps. When possible I stamped the inside of the image using the appropriate color of ink.


Sometimes I use the water brush to pick up some ink from the pad and use it to delicately paint in the image. Mulberry paper is quite absorbent and you will probably have to use less of the damp ink than you would guess. I started with brush in the center of the grape, and let the color wick around until it filled up inside the lines.


Oh yeah, it's messy. Be sure to have a good absorbent pad under your mulberry paper.


In fact, the pursuit of artistic courage is messy, often involving ink that strays beyond the Stazon border. (maybe we need Staz In - hahahaha)


Anyway, to soften of the edges, I use a sponge with chocolate ink to "antique" the image.


This next step began as an attempt to hide some particularly messy coloring, but I liked the outcome so well that I use it on almost all the blocks now.


I spray the entire square with adhesive and sprinkle with a really fine, clear glitter. The resulting subtle sparkle gives the final project a polished look.


Spread liquid glass, or something similar evenly across the surface of the block using a sponge applicator.


A couple of times I've adhered the mulberry paper upside down (remember the hole for the lights is on the bottom of the block) Grrr - hate when that happens.


Finally, stuff the lights in the hole.


Voila - a completed lamp. Okay, it isn't complete. It still needs a bow. I'll try and post the bow making tutorial tomorrow.


Happy Crafting!